Archives for the month of: October, 2011

Maybe soon I’ll be baking pecan tarts and more expertly blowtorching a creme bruleé. The universe somehow senses I am not a dessert person and is taking revenge. My desserts have been such an embarrassment that I have lost all the confidence to stir sugar into flour or beat egg whites to prescribed stiffness. So, in the meantime, dessert is some hard candy you can scoop out of that small, shiny jar on the sideboard by the dining table. Go take a couple or more after a meal, or before you leave, as I often forget to be a gracious host and offer guests some sweets.


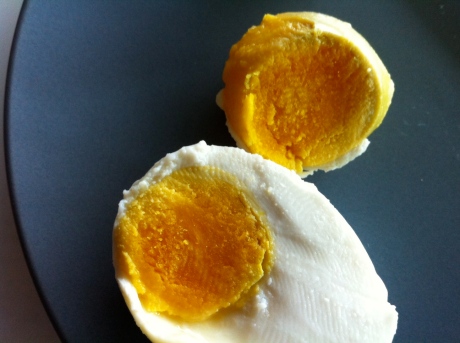
Salted Egg Sliced Open

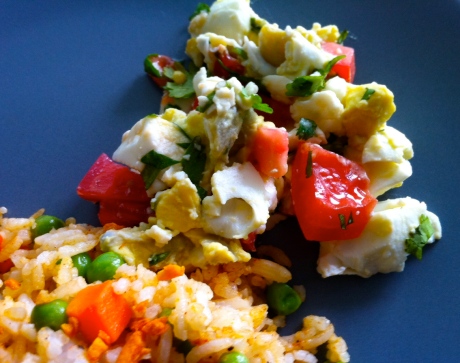
It gets my goat whenever I crack open a salted egg and find the yolk missing that bright yellow-orange hue and that oily but firm, grainy center. There’s also that level of saltiness I expect from the white, the one that grips the surface of the tongue, but nicely blends into the tartness of tomatoes and the pungency of cilantro, one that I can push a little bit more to the edge with a drizzle of patis, then pull back to safety with some fried rice. It’s a little tug-o-war I love to play with salted eggs, but with the dull, bland ones I get occasionally from the Chinese grocery, it’s game over even before they’re plated.

So, why not make the salted eggs myself?

I found this link in Purple Yam’s Facebook page and proceeded to buy (chicken) eggs and (a lot of) salt. Except for the waiting part (14-20 days), making salted eggs was easier than I thought. The only challenge was keeping the eggs submerged in the water, but a ramekin placed on top of the eggs effectively pushed the lot down as soon as I closed the jar. It was also important to ensure that the water was properly salted, but the recipe was very clear on how to achieve that.

While I was satisfied with the results, I thought I do a few things differently with my next batch.

1) Use duck, instead of chicken, eggs. Yes, I just spotted fresh duck eggs in my favorite store in Chinatown! Duck eggs are generally bigger; they’re also fattier, so they’ll give that sought-after oily rim and center. The yolk is also brighter. If I have to use chicken eggs, I’ll get the organic ones; their yolks are naturally deeper in color than the hugely commercial brands.

2) Pump up the saltiness level by keeping the eggs in the brine solution for at least 20 days. A 22-day soak was more to my liking.

3) Boil the eggs in tea-infused water. It won’t flavor the eggs, but tint the shell so it’s easy to differentiate the salted eggs from the regular ones. Better than painting each egg a hideous red which stains hands, cutting board, kitchen counter and, ironically, everything in the kitchen that I want to keep immaculately white.

4) A dark green color around the yolk means the eggs have been over-boiled or cooked. Check this article for tips on how to boil eggs. Purple Yam also mentioned that a friend prefers to steam duck eggs (10 minutes). Hmmm, very interesting. Will definitely try, next time!

Need I say I saved money, too? Not much, maybe 15-20 cents a piece. But in the end, it’s not really about the money, but the pleasure of the harvest. Awwwww…..

—————————

Here’s the recipe for Salted Eggs (Khai Kham):

Ingredients

12 Raw Large Eggs
500 gms Salt
4 Litres Water
Large Boiling Pan
Big Glass Jar

Preparation
1. The eggs are salted in a saturated brine solution. This means the maximum amount of salt you can dissolve in the water!
2. Boil water in a large pan.
3. Add the salt to the water and dissolve it. Add more salt until the salt can no longer dissolve.
4. Leave to cool, as the water cools, salt crystals should form. If they do not, heat it up and add more salt.
5. Put the cold brine and eggs into a jar, the eggs must be submerged in the brine.
6. After 14-20 day take it out of the jar. They can be kept for a long time in that salted condition.
7. They can be used boiled or fried or to add salt to a dish.

Salted Eggs with Fried Rice

When Rama said she missed sinigang, Poch and I resolved that October 3-7 was going to be a Pinoy Food week for the family. To up the level of difficulty a bit – a challenge I assumed was directed at me – it was also going to be vegetarian. Now, we all know that Pinoy ≠ vegetarian. Even pinakbet, which Filipinos swear is vegetarian, has bits of pork or shrimp in it – pampalasa lang naman, as a friend once argued.

The vegetarian sinigang (Monday) and the kalabasa at sitao sa gata (Tuesday) were easy enough, as we had cooked them fairly often. But vegetarian kare-kare? Sans bagoong, to boot!

Me, Chef Geoff Hopgood, and Mr. Neil. Chef Geoff was the featured chef at my recent birthday party.

My first and last attempt at a vegetarian version was more than a year ago, a dismal failure, with the vegetables ending up mushy and unrecognizable in the peanut sauce.

Chef Geoff's take on Kare-Kare proves it can be served in a beautiful, appetizing way.

Inspired by the kare-kare that Chef Geoff Hopgood prepared for my birthday party, I thought I could do better this time. The secret, as I found out with my oxtail kare-kare, was to blanch the vegetables quickly, throw them in an ice bath and serve them separate from the sauce. But then, Chef Geoff cubed and fried the eggplants – a neat trick, as eggplants and I had been long-time adversaries in the kitchen. Maybe if I treated them special too, they would keep their beautiful purple color and firmness and we could be friends finally. Hence, eggplant slices in panko crust! They turned out visually interesting and, on the taste front, crunchy and flavorful. On my vegetarian kare-kare, they shared star billing with the peanut sauce.

P.S.

Here’s a short note about blanching vegetables: I learned from my mom that adding baking soda in the boiling water helped the vegetables keep their color and crunch. Maybe I’ll try this trick when I don’t have enough time and patience for panko-crusted eggplants. I also added baking soda to the flour to make a firmer, crunchier panko crust, a tip I read somewhere. Hmmm, baking soda… it’s even good for scouring stovetops and kitchen counters.

—————————–

Eggplant in Panko Crust

1 asian eggplant,  1/2-inch diagonal slices

1/2 cup flour combined with 1 tsp of baking soda

1 egg beaten

1/2 cup panko crust

Dip eggplant slices in the flour mix, egg and panko, then fry in canola oil. When slices turn golden brown, transfer to a plate with paper towel to drain. Keep warm.

Peanut sauce

1/2 cup diced onion

1/2 cup diced tomato

2 cloves garlic minced

2 tablespoons canola oil

1 tablespoon peanut butter

1 tablespoon annato oil

1/3 cup roasted unsalted peanuts and toasted rice, finely ground

2-1/2 or 3 cups vegetable broth

Salt and pepper to season

Bagoong, on the side for the non-vegetarians

Saute onion, garlic and tomato. When softened, add peanut butter and stir until smooth. Add broth and the annato oil. Bring to a boil then add the ground peanuts and toasted rice. Lower heat and simmer until sauce is in your desired consistency. Season with salt and pepper.

Blanched Vegetables

Boil about 4 cups water and add a teaspoon of baking soda. Blanch the long beans and  baby bokchoy for one minute or less and immediately put in an ice bath or cold water to stop the cooking. Drain and arrange on a platter, with the panko-crusted eggplant slices.

This recipe serves 3.